

لقد أحدث الذكاء الاصطناعي ثورة حقيقية في عالم البرمجة، ولكن مع مرور الوقت، بدأ المطورون يلاحظون نمطاً مزعجاً: أنت تصف فكرتك للذكاء الاصطناعي، فيعطيك كتلة من الأكواد، غالباً ما تبدو صحيحة ولكنها لا تعمل بالشكل المطلوب، أو تفتقر إلى البنية الهندسية السليمة. يُعرف هذا الأسلوب العشوائي باسم “البرمجة بالمزاج” (Vibe Coding). هنا يأتي دور أداة GitHub Spec Kit، والتي تم ابتكارها لتغيير هذه الفوضى وتقديم نهج هندسي احترافي يُعرف باسم “التطوير الموجه بالمواصفات” (Spec-Driven Development – SDD).
في هذا المقال الشامل، سنتعمق في فهم أداة GitHub Spec Kit، وكيفية تنزيلها على أنظمة التشغيل المختلفة، وكيف يمكنك الاستفادة منها لتحويل الذكاء الاصطناعي من مجرد “محرك بحث يكتب الأكواد” إلى “مهندس برمجيات وزميل عمل” يتبع معاييرك بدقة متناهية.
ما هي أداة GitHub Spec Kit؟
تعرف أداة GitHub Spec Kit بأنها حزمة أدوات مفتوحة المصدر (Open Source Toolkit) طورتها منصة جيت هب (GitHub)، وتعمل كواجهة موجهة للذكاء الاصطناعي. تهدف هذه الأداة إلى دمج أدوات الذكاء الاصطناعي مثل (GitHub Copilot، و Claude Code، و Gemini CLI) في بيئة عملك بطريقة منهجية.
بدلاً من كتابة الأكواد مباشرة، تجبرك الأداة على التفكير مثل مدير المنتج ومهندس البرمجيات. حيث تبدأ بكتابة “مواصفات” (Specifications) واضحة، ثم تقوم الأداة بتحويل هذه المواصفات إلى خطة عمل تقنية، ومن ثم إلى مهام دقيقة، وأخيراً تدفع الذكاء الاصطناعي لكتابة الأكواد بناءً على هذا السياق الشامل. بفضل هذا النهج، تصبح المواصفات هي “المصدر الموثوق للحقيقة” (Source of Truth) بدلاً من الأكواد نفسها.
لماذا نحتاج إلى الانتقال للتطوير الموجه بالمواصفات (SDD)؟
في العقود الماضية، كان الكود هو الملك. أما اليوم، ومع قدرة الذكاء الاصطناعي على كتابة آلاف الأسطر في ثوانٍ، أصبحت “النوايا” و”المواصفات” هي الأهم. استخدام أداة GitHub Spec Kit يحل العديد من المشاكل:
- القضاء على الهلوسة البرمجية: يمنع الذكاء الاصطناعي من اختراع مكتبات وهمية أو استخدام تقنيات لا تناسب مشروعك.
- الحفاظ على السياق (Context): يضمن أن الذكاء الاصطناعي يتذكر قواعد مشروعك (مثل استخدام TypeScript دائماً، أو تجنب دوال معينة).
- سهولة التعديل: إذا أردت تغيير ميزة، لا تذهب لتعديل الكود المعقد، بل تعدل ملف “المواصفات” وتجعل الذكاء الاصطناعي يولد الأكواد من جديد.
كيفية تنزيل وتثبيت أداة GitHub Spec Kit
للبدء في استخدام أداة GitHub Spec Kit، ستحتاج إلى إعداد بيئة التطوير الخاصة بك. تعتمد الأداة بشكل أساسي على أداة uv (وهي أداة سريعة جداً لإدارة حزم بايثون). سنشرح هنا كيفية التثبيت مع مراعاة اختلاف أنظمة التشغيل (ويندوز، ماك، ولينكس).
الخطوة الأولى: تثبيت أداة uv (المتطلب الأساسي)
بالنسبة لمستخدمي نظام Windows:
افتح موجه الأوامر (PowerShell) بصلاحيات المسؤول (Administrator) وقم بتشغيل الأمر التالي:codePowershell
powershell -ExecutionPolicy ByPass -c "irm https://astral.sh/uv/install.ps1 | iex"بالنسبة لمستخدمي نظامي macOS و Linux:
افتح الطرفية (Terminal) وقم بتشغيل الأمر التالي:codeBash
curl -LsSf https://astral.sh/uv/install.sh | shالخطوة الثانية: تثبيت أداة GitHub Spec Kit (عبر Specify CLI)
بمجرد تثبيت uv، أصبحت جاهزاً لتثبيت الأداة. يوفر لك النظام طريقتين:
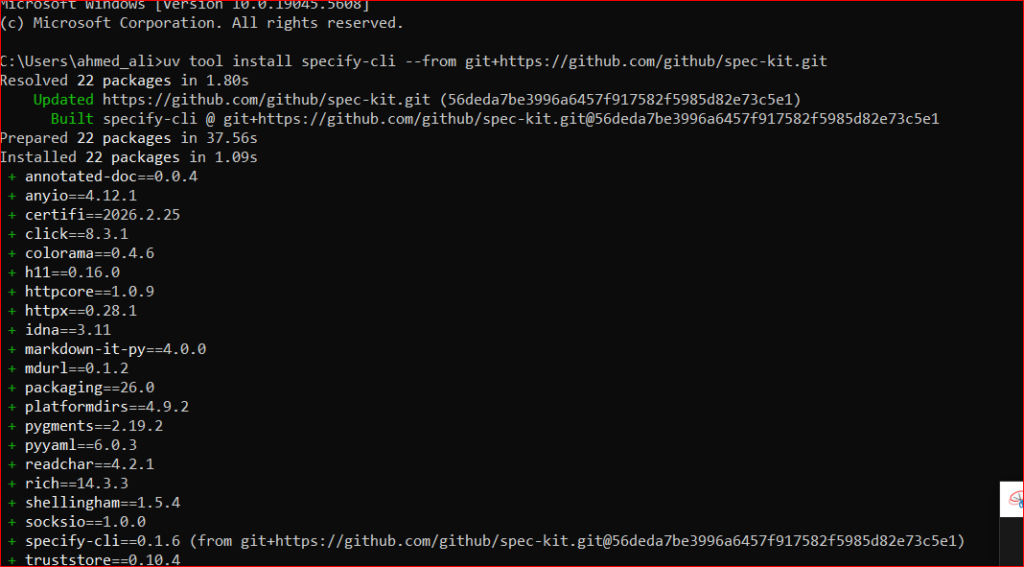
1. التثبيت الدائم (الموصى به):
هذا الخيار يجعل الأداة متاحة دائماً في جهازك:codeBash
uv tool install specify-cli --from git+https://github.com/github/spec-kit.git2. الاستخدام لمرة واحدة (بدون تثبيت دائم):
إذا كنت ترغب فقط في تجربة الأداة دون تثبيتها في مسار نظامك الأساسي، يمكنك استخدام uvx:codeBash
uvx --from git+https://github.com/github/spec-kit.git specify init <PROJECT_NAME>كيفية الاستفادة من أداة GitHub Spec Kit في مشاريعك
بعد نجاح عملية التثبيت، دعونا نتعرف على كيفية دمج أداة GitHub Spec Kit في سير عملك اليومي. تعتمد الأداة على مجموعة من الأوامر (Slash Commands) التي تنظم عملية التفكير والتنفيذ.
1. تهيئة المشروع (Initialization)
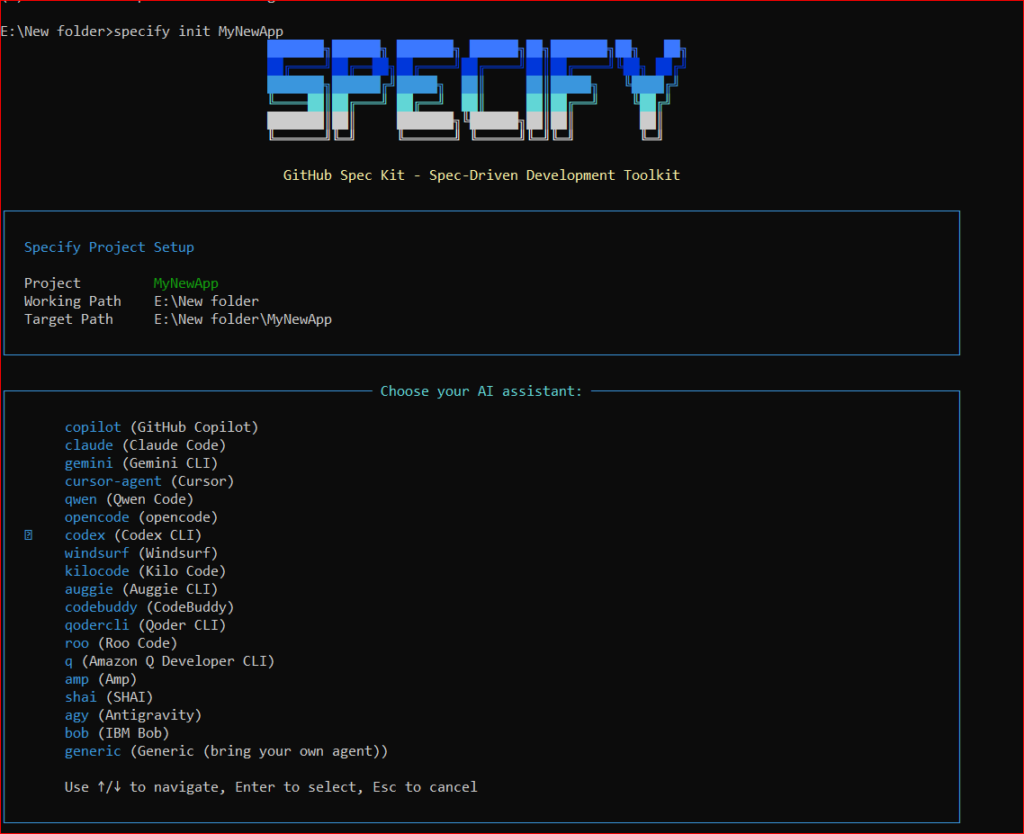
افتح الطرفية في مجلد جديد أو مجلد مشروعك الحالي، وقم بتهيئته كالتالي:codeBash
# لتهيئة مشروع جديد
specify init MyNewApp

# أو لتهيئة مشروع موجود بالفعل مع تحديد نوع الذكاء الاصطناعي (مثل Claude)
specify init --here --ai claude
سيقوم هذا الأمر بإنشاء مجلد مخفي .specify يحتوي على القوالب والسكريبتات التي تدير سياق الذكاء الاصطناعي.
2. وضع الدستور البرمجي (/speckit.constitution)
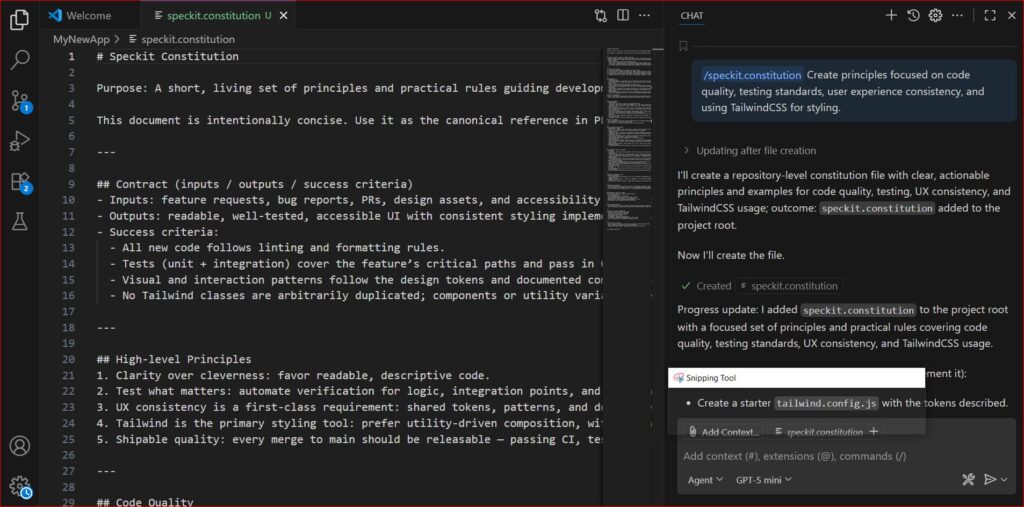
أول وأهم خطوة في أداة GitHub Spec Kit هي كتابة الدستور (Constitution). هذا الملف يمثل القوانين الثابتة لمشروعك.
قم بفتح مساعد الذكاء الاصطناعي في محرر الأكواد (VS Code مثلاً)، واكتب:
/speckit.constitution Create principles focused on code quality, testing standards, user experience consistency, and using TailwindCSS for styling.سيقوم الذكاء الاصطناعي بكتابة ملف constitution.md، والذي سيقرأه المساعد في كل مرة يكتب فيها كوداً لضمان عدم الخروج عن هذه القواعد.
3. تحديد المواصفات (/speckit.specify)
بدلاً من القول “اصنع لي تطبيق مهام”، يجب أن تكتب مواصفات دقيقة لمنتجك:
/speckit.specify Develop a Task Management App. It should allow users to create tasks, assign them to team members, and move them between columns (To Do, In Progress, Done). Do not focus on the tech stack yet, just the functional requirements.ستقوم الأداة بإنشاء ملف spec.md يحتوي على قصص المستخدمين (User Stories) ومتطلبات العمل، ليكون مرجعاً واضحاً لما سيتم بناؤه.
# Task Management App - Functional Specification

This document outlines the functional requirements for a task management application. It describes the core capabilities without prescribing any specific technology stack.

## Overview
The application enables individuals and teams to track work through a simple kanban-style board. Users can create tasks, assign them to team members, and move them between status columns. The system should be flexible enough for personal use or small to medium-sized teams.

## Actors
- **User**: any authenticated person who can create and manage tasks.
- **Team Member**: a user who can be assigned to tasks and participate in task workflows.
- **Administrator (optional)**: can manage users, teams, and global settings.

## Core Entities
- **Task**
  - Unique identifier
  - Title (required)
  - Description (optional, rich text or plain)
  - Assignee(s) (zero or more users)
  - Creator (user who created the task)
  - Status: one of `To Do`, `In Progress`, `Done` (initially `To Do`)
  - Priority (optional: Low, Medium, High)
  - Due date (optional)
  - Creation timestamp
  - Last updated timestamp
  - Comments/Activity log (history of changes and user notes)
- **User**
  - Unique identifier
  - Name
  - Email (used to invite or identify)
  - Avatar (optional)
- **Board** (optional for multi-board support)
  - Title
  - Contains multiple columns and tasks
- **Column**
  - One of the standard statuses or customizable
  - Contains ordered collection of tasks
- **Team/Workspace**
  - Group of users sharing boards and tasks

## Functional Requirements

### Authentication & User Management
- Users must sign up and log in (via email/password or third-party providers).
- Users can be invited to a team/workspace by email.
- Users can view and update their profile (name, avatar).

### Task Management
- **Create Task**: Users can create a new task by providing a title and optionally description, assignees, priority, due date, and attachments.
- **Edit Task**: Users can update any mutable field of a task after creation.
- **Assign Task**: Tasks can be assigned to one or more team members. A task may also be unassigned.
- **Delete Task**: Creator or authorized users can delete a task.
- **View Task Details**: Clicking or selecting a task opens a detailed view showing all metadata, comments, and History.

### Board and Columns
- **Default Board**: The app should include a default board with three columns: `To Do`, `In Progress`, and `Done`.
- **Custom Columns**: Administrators or authorized users can add, rename, or remove columns on a board.
- **Reorder Columns**: Columns can be reordered via drag-and-drop.
- **Column Limits**: Optionally limit the number of tasks in a column (WIP limits).
- **Multiple Boards**: Support for multiple boards within a team or workspace.

### Task Workflow
- **Drag and Drop**: Users can move tasks between columns by dragging them on the board. The task's status updates accordingly.
- **Reorder Tasks**: Within a column, tasks can be reordered manually.
- **Bulk Actions**: Users can select multiple tasks to move, assign, or delete them in a single action.

### Collaboration Features
- **Comments**: Each task supports a comment thread where users can add messages, mention team members, and attach files.
- **Notifications**: Users receive notifications when:
  - They are assigned or unassigned from a task.
  - A task assigned to them changes status.
  - A comment mentions them.
  - Optional notification for due date approaching.
- **Activity Log**: Task detail includes a log of changes (status updates, assignee changes, edits).

### Search and Filtering
- **Search**: Users can search for tasks by title, description, or assignee.
- **Filter**: Filters include status, assignee, priority, due date range, and keyword.
- **Sort**: Tasks can be sorted by creation date, due date, priority, or custom order in column.

### User Experience
- **Responsive UI**: The interface works on desktop and mobile devices.
- **Accessibility**: Keyboard navigation, semantic markup, and screen reader support for core interactions.
- **Performance**: Board updates should be real-time or near real-time when multiple users are interacting.

### Data Persistence & Sync
- **Offline Support (optional)**: Allow working offline with local storage syncing when connection is restored.
- **Real-Time Collaboration**: Use websocket or polling to update boards across users.

### Administration & Settings
- **Team Settings**: Manage members, invite/remove users, and set permissions.
- **Access Control**: Define roles such as admin, editor, viewer with corresponding rights.
- **Audit Logging**: Track key actions at team or workspace level for compliance.

### Non-Functional Requirements
- **Scalability**: Should handle a moderate number of users and tasks without degradation.
- **Security**: Follow best practices for authentication, authorization, and data storage. Protect against XSS, CSRF, and injection attacks.
- **Reliability**: Ensure data is persisted and recoverable in case of failures.
- **Maintainability**: Codebase organized with clear module boundaries and tested.

### Extensibility
- **Integrations**: Provide an API or webhooks to integrate with other tools (e.g., Slack, email, calendar).
- **Custom Fields**: Support adding custom metadata to tasks.
- **Templates**: Ability to create task or board templates for recurring workflows.

---

This specification avoids technical choices and focuses solely on the functional behavior expected from the Task Management App. It can be used to inform design, development, and testing regardless of the eventual technology stack chosen.
4. التخطيط التقني (/speckit.plan)
الآن حان وقت اختيار التقنيات. استخدم هذا الأمر لتوجيه الذكاء الاصطناعي لاختيار الهيكلية المناسبة:
/speckit.plan The application will use React (Vite) for the frontend, Node.js for the backend, and SQLite for the local database.ستتولى أداة GitHub Spec Kit ترجمة هذه المتطلبات إلى خطة هندسية مفصلة تتضمن هيكل المجلدات وأنماط التصميم (Design Patterns).
# Development Plan

This document outlines the initial architecture and tool choices for the Task Management App.

## Technology Stack

- **Frontend**
  - Framework: React (initialized with Vite)
  - Styling: TailwindCSS (per constitution guidelines)
  - State management: local state with React Context or a lightweight state library (e.g. Zustand), depending on complexity
  - Build tooling: Vite (fast dev server, HMR, and ESM builds)

- **Backend**
  - Runtime: Node.js (LTS)
  - Framework: Express or Fastify (will choose one during initial scaffolding)
  - API style: RESTful endpoints with JSON; optionally GraphQL in future
  - Authentication: JWT with Passport.js or custom middleware
  - Real-time: WebSockets (Socket.io or native ws) for board updates

- **Database**
  - SQLite as the local development database for simplicity and easy portability
  - Use an ORM such as Prisma or Sequelize for type-safe models and migrations

- **Testing**
  - Frontend: Vitest + React Testing Library for unit/integration, Playwright for E2E
  - Backend: Jest or Vitest for unit tests, supertest for API integration tests
  - Database: use SQLite in-memory mode for tests

- **Infrastructure**
  - Local development: Node.js server, Vite frontend, SQLite file
  - Deployment: TBD, likely Docker-enabled for local and cloud environments

- **Tooling & Workflow**
  - Linting/Formatting: ESLint + Prettier configured across frontend and backend
  - Commit hooks: Husky with lint-staged
  - CI: GitHub Actions to run lint, tests, build steps, and code coverage
  - Code hosting: Git repository (likely on GitHub)

- **Project Structure (initial suggestion)**
  - `/frontend` – React application generated by Vite
  - `/backend` – Node.js server with route handlers and services
  - `/shared` or `/common` – types/interfaces shared between frontend and backend
  - `/prisma` – database schema and migration files (or equivalent)

- **Development Workflow**
  1. Scaffold frontend using `npm create vite@latest frontend --template react`.
  2. Setup TailwindCSS in the frontend.
  3. Scaffold backend (`npm init` or similar, choose Express/Fastify).
  4. Install and configure ORM with SQLite.
  5. Define data models according to spec (Task, User, Board, Column, etc.).
  6. Implement authentication and the initial REST API endpoints for tasks.
  7. Create a simple kanban board page in React and connect operations to the backend.
  8. Add real-time updates with WebSockets.
  9. Expand features iteratively following the specification.

This plan can evolve but sets the immediate direction with React/Vite frontend, Node.js backend, and SQLite persistence.
5. تقسيم المهام (/speckit.tasks)
هنا تبرز قوة التنظيم. بمجرد أن تصبح المواصفات والخطة التقنية جاهزة، اطلب من الذكاء الاصطناعي تحويلها إلى مهام قابلة للتنفيذ:
/speckit.tasksسينتج عن ذلك ملف يحتوي على المهام (Tasks) مكسرة إلى وحدات صغيرة ومستقلة، مما يسهل تتبعها وتنفيذها دون حدوث تعارض.

6. مرحلة التنفيذ وكتابة الأكواد (/speckit.implement)
أخيراً، يمكنك الآن الجلوس ومشاهدة السحر. قم بتوجيه الأداة لتنفيذ مهمة محددة من القائمة التي تم إنشاؤها:
/speckit.implement task 1سيبدأ وكيل الذكاء الاصطناعي (سواء كان Copilot أو Claude) في قراءة הדستور، المواصفات، والخطة التقنية، ثم يقوم بكتابة الكود بأعلى جودة ممكنة.
الفوائد الجوهرية لاستخدام أداة GitHub Spec Kit
قد يتساءل البعض، أليس هذا العمل بطيئاً ومعقداً مقارنة بكتابة الأوامر المباشرة؟ الإجابة هي: لا، بل هو أسرع وأكثر استدامة. إليك أهم فوائد دمج أداة GitHub Spec Kit في بيئة عملك:
- التعاون السلس بين فرق العمل: بفضل ملفات المواصفات الواضحة، يمكن لأي مطور جديد ينضم للفريق أن يفهم المشروع فوراً، ويمكن للذكاء الاصطناعي إرشاده بناءً على الدستور الثابت.
- سهولة الصيانة وإعادة الهيكلة: عندما تتغير متطلبات العميل، لن تضطر للبحث في آلاف الأسطر البرمجية. كل ما عليك فعله هو تحديث ملف spec.md، وطلب إعادة التخطيط والتنفيذ من الذكاء الاصطناعي.
- توفير الوقت والجهد على المدى الطويل: على الرغم من أن الإعداد الأولي (كتابة المواصفات والخطط) يأخذ بضع دقائق، إلا أنه يوفر ساعات طويلة من التنقيح وإصلاح الأخطاء التي تنتج عن “البرمجة بالمزاج” (Vibe Coding).
- التوافق التام (Agnostic): الأداة ليست مقفلة على نموذج ذكاء اصطناعي واحد، فيمكنك استخدامها مع نماذج OpenAI، أو Anthropic، أو Google بحرية تامة.
خاتمة
في الختام، الانتقال من العشوائية إلى الهندسة المنهجية هو ما يميز المطور المحترف عن غيره. لقد جاءت أداة GitHub Spec Kit لترسم معالم حقبة جديدة في تطوير البرمجيات، حيث يتولى الإنسان التفكير، التخطيط، والقيادة، بينما يقوم الذكاء الاصطناعي بالمهام الشاقة المتمثلة في كتابة الأكواد وتنفيذها. سواء كنت تعمل على نظام ويندوز، ماك، أو لينكس، فإن إعداد هذه الأداة سيعطيك قدرة خارقة على إنتاج برمجيات موثوقة وقابلة للتوسع في وقت قياسي.
لا يفوتك قرائة هذه المقالات :
- Spec-driven Development : كيف تحوّل Markdown إلى لغة برمجة بالذكاء الاصطناعي
- Kiro vs Google Antigravity : معركة عقول الوكلاء الذكية في عالم التطوير الحديث (2025)